
As part of my current job, I have needed to do OS reinstalls on a frequent basis. Given that my work revolves around CUDA, here are some of the steps I follow in my workflow to get Nvidia drivers playing well in Linux.
**Disclaimer: *I take no responsibility if your system breaks or crashes. This is purely for learning and informational purposes. Please back your files up. The steps herein are not official official, they are largely based on what has worked in my experience so far. It might not work sometime in the future, wherein “sometime” can range from 10 minutes to 30 years.**FOLLOW THE NVIDIA DOCUMENTATION ALONGSIDE THIS, EVEN IF IT FEELS LIKE READING A WALL OF TEXT!!!
Do you have the luxury of installing an OS right now, without losing anything crucial/restoring from a backup?
If so, please just download and install a distribution that comes with Nvidia drivers pre-compiled. Tons of distros exist to fill in this niche: my personal favorite being Pop!_OS, based on Ubuntu with up to date apt repositories, and Nvidia drivers + kernels + CUDA developer toolkit ready to go right out of the box. Even popular commercially-backed distros like Ubuntu and Fedora now give the option to install Nvidia Drivers automatically during the install step (you will still need to install the CUDA developer toolkit, but that is much easier and can likely be handled by your distro’s package manager).
The only downside to this approach is that the latest CUDA driver available can usually become whatever version the distro was packed with when it was released. For a rolling release distro like Fedora, this is a non-issue. However, for LTS distros like Ubuntu: you can often end up with slightly older but still working and rock solid versions of the driver and kernel. Despite this, I would generally recommend this path: as the drivers are only slightly old and will be perfectly fine for 99% of your development requirements.
However, I understand that you may either want a distro of your choice, or have other constraints, or just want the latest drivers available (I fall in this third category). Let’s assume for now that you have a clean install of the Linux distro of your choice.
First off, do not solely rely on your distro’s package manager
Weirdly speaking, this is one of the few times when relying on a package manager might be more detrimental than helpful. Nvidia regularly pushes a lot of updates to the GPU kernel and driver, which are not updated on the package manager port of CUDA/nvidia-driver. While newer drivers are backwards compatible with older kernels, the flip side is not true: causing issues ranging anywhere between “my GUI is gone” to Linux kernel panics and system crashes.
When starting with a fresh operating system installation, getting the Nvidia driver set up correctly is the critical first step before installing the CUDA Toolkit. According to Nvidia’s documentation, using distribution-specific packages (like .deb or .rpm files) is a recommended method for a clean installation. This approach integrates well with your system’s package management. However, for developers who need the absolute latest driver version or prefer a consistent installation method across different distributions, obtaining the driver directly from Nvidia’s website as a .run file is also a highly effective and often preferred method in the CUDA development community. This ensures you have the most recent driver that is guaranteed to be compatible with the latest CUDA toolkits.
For a clean OS install, here’s how to proceed with the .run file method:
**Open Nvidia’s Driver Installation Documentation: **DO NOT SOLELY RELY ON MY ARTICLE. Use it as supplementary material to Nvidia’s Documentation on how to install CUDA drivers. You especially want to follow the pre-install actions and carefully compare your GPU to the provided CUDA compatibility.
Download the Correct Driver: Go to the Nvidia driver download page on the Nvidia website (located under “Driver Installation” in the documentation linked above). Select your specific GPU model, operating system (Linux 64-bit), and the recommended driver type (usually “Production Branch” for stability, which is often best for CUDA, or “New Feature Branch” for the very latest features). Download the
.runfile for your selected driver.Relive the 80s Switch to a TTY: You cannot install the Nvidia driver while the graphical environment (like GNOME, KDE, etc.) is running using the existing graphics drivers. You need to drop to a command-line interface. Log out of your graphical session and press
Ctrl + Alt + F1toF6to switch to a TTY (Terminal Teletype, just pure CLI). Log in with your username and password.Stop the Display Manager: Stop the service that manages your graphical environment (display manager). Common commands include:
sudo systemctl stop gdm3sudo systemctl stop lightdmsudo systemctl stop sddmsudo service gdm3 stopsudo service lightdm stopYou might need to try a couple before finding the correct one for your system. Ubuntu and GNOME use gdm3, Xfce uses lightdm afaik, and so on. Google which display manager your DE uses.
Run the Installer: Navigate to the directory where you downloaded the Nvidia
.runfile in the TTY. Make the file executable and run it withsudo:chmod +x NVIDIA-Linux-x86_64-*.run``sudo sh NVIDIA-Linux-x86_64-*.runThe installer is a guided process. Accept the license agreement. When prompted about installing the 32-bit compatibility libraries, it’s usually best to say yes. The installer will build the kernel module for your currently running kernel.Run
nvidia-xconfig(Recommended): The installer might prompt you to runnvidia-xconfig. This tool configures your X server to use the Nvidia driver. It’s generally recommended to let the installer do this or run it manually if prompted.Reboot: Once the installation is complete, reboot your system:
sudo reboot.
After rebooting, your system should load with the newly installed Nvidia drivers. You can confirm this by opening a terminal in your graphical environment and running nvidia-smi. This command should display details about your GPU and the installed driver version.
This .run file method, while manual, provides direct access to the latest compatible driver from Nvidia, which is crucial for ensuring optimal performance and compatibility with the CUDA Toolkit on a clean system.
What if you do not have a clean OS install?
If you’re not starting from a fresh operating system installation, the process requires a bit more care. The primary challenge is ensuring that any existing graphics drivers (especially the open-source Nouveau driver or older Nvidia installations) are completely removed before installing the new ones. Failure to do so is a common cause of installation failures, black screens, or system instability.
Here’s a general workflow:
Switch to a TTY: Log out of your graphical session and press
Ctrl + Alt + F1toF6to switch to a TTY (Terminal Teletype, just pure CLI). Log in with your username and password.Stop the Display Manager: The graphical environment is managed by a display manager (like
gdm3,lightdm,sddm, etc.). You need to stop this service. Follow the step with this same name in the above heading.Remove Existing Drivers: This is a crucial step. You need to uninstall any previously installed Nvidia drivers and potentially blacklist the Nouveau driver.
Using Package Manager: If you installed via a package manager, use your distro’s uninstall command (e.g.,
sudo apt autoremove nvidia-*on Debian/Ubuntu,sudo dnf remove \*nvidia\*on Fedora,sudo pacman -Rns nvidiaon Arch). Be cautious with package manager removals to avoid removing essential system components.Using the
.runfile (not the most recommended): If you previously installed using an Nvidia.runfile, download the .run file for that specific driver/kernel installation, and run it with the uninstall flag:sudo sh NVIDIA-Linux-x86_64-*.run --uninstallBlacklist Nouveau: You may need to explicitly blacklist the open-source Nouveau driver to prevent it from loading on boot. This usually involves creating or editing a configuration file in
/etc/modprobe.d/. A common method is to create a file like/etc/modprobe.d/blacklist-nouveau.confand add the following lines:
`blacklist nouveau
options nouveau modeset=0

`
Then, regenerate your initramfs/initrd: sudo update-initramfs -u (Debian/Ubuntu) or sudo dracut --force (Fedora/CentOS).
Install the New Driver: Navigate to the directory where you downloaded the Nvidia
.runfile in the TTY (follow steps before this heading, you now have a fresh install). **You can follow the fresh install steps from hereon, but here’s a gist: **Make the file executable and run it withsudo:chmod +x NVIDIA-Linux-x86_64-*.run``sudo sh NVIDIA-Linux-x86_64-*.runThe installer will guide you through the process. Accept the license, and when prompted about installing the 32-bit compatibility libraries, usually say yes. The installer might warn you about the Nouveau driver or prompt you to runnvidia-xconfig. Follow the installer’s recommendations.Reboot: Once the installation is complete, reboot your system.
After rebooting, your system should load with the newly installed Nvidia drivers. You can verify the installation by opening a terminal in your graphical environment and running nvidia-smi. This command should display information about your GPU and the installed driver version.
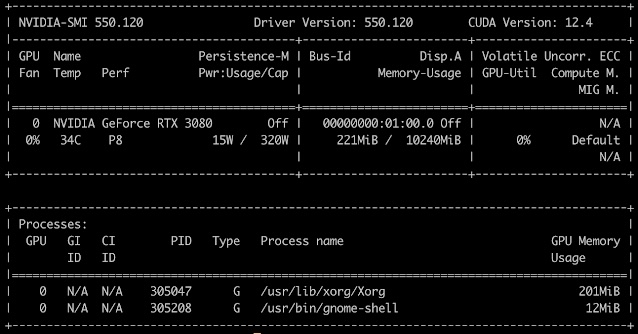
Example nvidia-smi output from my workstation. Note Driver version 550 with CUDA 12.4 | 12.4 requires at least driver version 525
Alternate Install Methods as a last ditch before OS reinstall (not recommended)
While the .run file from Nvidia’s website is generally the most reliable method for CUDA development due to its directness and access to the latest compatible versions, there are other ways to install Nvidia drivers. However, these often come with drawbacks when working with CUDA:
- Building from tarball archives:Nvidia provides tarballs for their drivers. Installing from the archives give you the most control over the build process and can be useful for specific, highly customized environments or debugging. However, it is significantly more complex, time-consuming, and prone to errors related to build dependencies, kernel headers, and configuration issues. For a standard development workflow focusing on CUDA, the complexity usually outweighs the benefits.
Here are the general steps involved in building Nvidia drivers from source:
- Install Build Dependencies: You will need build tools, kernel headers matching your currently running kernel, and other libraries. The specific packages vary by distribution.
1. **Debian/Ubuntu:**`sudo apt update && sudo apt install build-essential dkms linux-headers-$(uname -r) pkg-config`

1. **Fedora/CentOS:**`sudo dnf groupinstall "Development Tools" && sudo dnf install kernel-devel-$(uname -r) pkg-config`

1. **Arch Linux:**`sudo pacman -S base-devel dkms linux-headers pkgconf`
Download the Archive: Obtain the Nvidia driver source code from the Nvidia developer website. This is typically packaged as a
.tar.gzor.bz2file.Extract: Extract the downloaded archive:
tar -xzf NVIDIA-Linux-x86_64-*.tar.gz(adjust the command based on the file extension).Switch to a TTY and Stop Display Manager: Follow steps 2 and 3 from the “What if you do not have a clean OS install?” section above to switch to a TTY and stop your display manager.
Remove Existing Drivers: Follow step 4 from the “What if you do not have a clean OS install?” section to remove any existing Nvidia or Nouveau drivers.
Navigate to Source Directory: Change into the extracted source code directory.
Run the Configuration Script: Run the configuration script, which prepares the source code for building on your system. You may need to pass options depending on your system and desired configuration.
sudo ./configureBuild the Driver: Compile the driver modules. This step can take a significant amount of time.
sudo makeInstall the Driver: Install the compiled modules and other necessary files.
sudo make installRun
nvidia-xconfig(Optional but Recommended): This tool configures your X server to use the Nvidia driver.sudo nvidia-xconfigReboot: Restart your system:
sudo reboot.
Building from source requires a deep understanding of your system’s build environment and can be challenging to debug if issues arise.

- Using Distribution Package Managers (e.g.,
apt,dnf,pacman): Many Linux distributions include Nvidia drivers in their repositories. This is the easiest method from a user perspective: a simplesudo apt install nvidia-driver-xxxor equivalent command. This method requires you have a complete in-depth understanding on which driver versions are compatible with which CUDA versions. As mentioned earlier, the versions available in distribution repositories often lag behind the latest releases from Nvidia. This lag can be a significant issue for CUDA development, as CUDA toolkits are often built and tested against specific, newer driver versions. Using an older driver with a newer CUDA toolkit, or vice-versa, can lead to compatibility problems, performance issues, or even failure of CUDA applications to run. The softball glitch is an error message stating “Nvidia Driver and kernel mismatch” and have CUDA not run, the hard error message is a non-working GUI and a possibly corrupt initramfs (say goodbye to booting this system next time). While convenient for general desktop use, relying solely on the distro’s package manager for Nvidia drivers when your primary focus is CUDA is generally not recommended.
Even though reinstalling your OS and doing the fresh install is the better path forward, here are the general steps for installing Nvidia drivers using common distribution package managers:
- Update Package Lists: Ensure your package manager’s lists are up-to-date.
1. **Debian/Ubuntu:**`sudo apt update`

1. **Fedora/CentOS:**`sudo dnf check-update`

1. **Arch Linux:**`sudo pacman -Syu`
- Search for Available Drivers: Search your distribution’s repositories for available Nvidia driver packages. The naming convention varies.
1. **Debian/Ubuntu:**`apt search nvidia-driver` (look for recommended versions like `nvidia-driver-470`, `nvidia-driver-515`, etc.)

1. **Fedora/CentOS:**`dnf search nvidia-driver` (often requires enabling third-party repositories like RPM Fusion)

1. **Arch Linux:**`pacman -Ss nvidia` (look for `nvidia`, `nvidia-lts`, `nvidia-dkms`, etc.)
- Install the Driver Package: Install the desired Nvidia driver package. Choose the recommended or latest stable version available in the repository.
1. **Debian/Ubuntu:**`sudo apt install nvidia-driver-xxx` (replace `xxx` with the version number)

1. **Fedora/CentOS:**`sudo dnf install akmod-nvidia` (this often builds the kernel module automatically)

1. **Arch Linux:**`sudo pacman -S nvidia` or `sudo pacman -S nvidia-dkms` (if you use a custom kernel or want DKMS support)
Blacklist Nouveau (if necessary): Some distributions automatically handle blacklisting Nouveau when installing the proprietary driver via the package manager. However, if you encounter issues, you may need to manually blacklist it as described in step 4 of the “.run” file installation process.
Generate Xorg Configuration (if necessary): Some package manager installations may require you to generate an Xorg configuration file.
sudo nvidia-xconfigReboot: Restart your system:
sudo reboot.
While simpler, remember the potential version lag when using package managers for CUDA development. Some distributions, like Pop!_OS, offer better-integrated Nvidia driver installations via their repositories, but this is not universal.
For the most stable and performant CUDA environment, especially when using the latest CUDA toolkits, obtaining the driver directly from Nvidia’s website via the .run file remains the preferred approach.
If at this point things seem messed up, my go-to has honestly been to do an OS reinstall from scratch and follow the preferred Nvidia method to install CUDA drivers and kernels. This has never failed me, so far.
Sick Driver bro, do you even compute?
Congratulations, you now most likely have a working GPU driver with working GUI (and have frantically re-cloned your git repositories and transferred your files back from an external drive). You still need to have a working CUDA + nvcc + Nvidia dev tools installation to actually code for the GPU. Fortunately, this is light years easier than wrestling with the driver installation, provided your driver is correctly installed and compatible.
The CUDA Toolkit includes the CUDA compiler (nvcc), libraries, development tools, samples, and the CUDA runtime. Just like with the drivers, the recommended method for a CUDA development workflow is to download the installer directly from Nvidia. This ensures you get the specific version of the toolkit you need, which is often tied to the CUDA version supported by your installed driver.
Steps for Installing the CUDA Toolkit:
Check Driver Compatibility: Before downloading, check the CUDA Toolkit Release Notes on the Nvidia developer website. These notes contain a table listing the minimum required driver version for each CUDA Toolkit version. Ensure your currently installed Nvidia driver meets or exceeds this requirement.
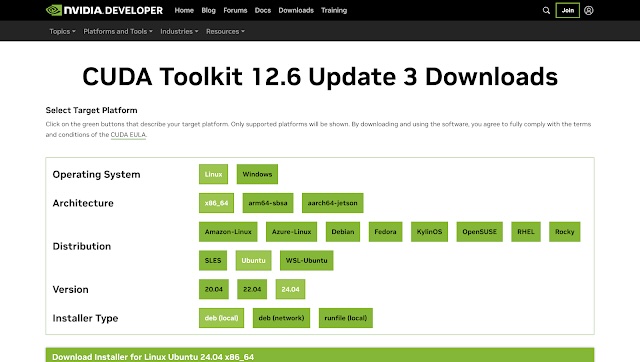
Download the CUDA Toolkit Installer: Go to the CUDA Toolkit download page on the Nvidia developer website. Select your operating system, architecture (Linux x86_64), distribution, version, and the installer type.
1. **Installer Types:**

  1. **Network (.deb/.rpm):** This downloads a small installer file that fetches the necessary packages from Nvidia's servers during installation. Requires an internet connection during installation.

  1. **Local (.deb/.rpm/.run):** This downloads a larger file containing all the necessary packages. Useful for offline installations or installing on multiple machines.

  1. **`.run` file:** A self-extracting installer that bundles everything. Similar to the driver installer, but specifically for the toolkit. This is often the most straightforward method after installing the driver via the `.run` file. Choose the installer type that best suits your needs. For consistency with the driver installation method discussed earlier, the `.run` file is a good choice.
- Run the Installer: Open a terminal and navigate to the directory where you downloaded the installer file.
1. **For `.run` file:** Make it executable and run it with `sudo`. `chmod +x cuda_*.run``sudo sh cuda_*.run` The installer will present you with options. **Crucially, when it asks about installing the driver, select NO.** You have already installed the driver separately using the recommended method. You only want to install the CUDA Toolkit components. Follow the prompts to accept the license and select the components you wish to install (usually the default components are sufficient).

1. **For .deb (Debian/Ubuntu):**`sudo dpkg -i cuda-repo-*.deb` (This adds the Nvidia CUDA repository) `sudo apt update``sudo apt install cuda` (This installs the full toolkit)

1. **For .rpm (Fedora/CentOS):**`sudo rpm -i cuda-repo-*.rpm` (This adds the Nvidia CUDA repository) `sudo dnf clean all``sudo dnf install cuda` (This installs the full toolkit)
- Set Environment Variables: After installation, you need to add the CUDA binary paths to your system’s
PATHandLD_LIBRARY_PATHenvironment variables. This allows your system to find the CUDA compiler and libraries. Edit your shell’s configuration file (e.g.,~/.bashrc,~/.zshrc) and add the following lines:
`export PATH=/usr/local/cuda/bin${PATH:+:${PATH}}
export LD_LIBRARY_PATH=/usr/local/cuda/lib64${LD_LIBRARY_PATH:+:${LD_LIBRARY_PATH}}

`
Save the file and source it or open a new terminal for the changes to take effect: source ~/.bashrc (or your respective file).
- Verify Installation: Open a new terminal and verify the installation by checking the
nvccversion:nvcc --versionThis should output information about the installed CUDA compiler version. You can also try compiling and running one of the CUDA sample programs (usually located in/usr/local/cuda/samples) to further confirm everything is working correctly.
Installing the CUDA Toolkit is generally a much smoother process than driver installation, especially when you’ve already handled the driver correctly. By downloading directly from Nvidia, you ensure compatibility with your driver and access to the specific toolkit version required for your development work.
And now you finally get to start delving into CUDA programming to fulfill your ML/AI and HPC needs. I’ll be posting some updates on where to get started if this is your first time tinkering with CUDA shortly :)
Cover image: UMass Amherst Fine Arts Center | Photographed 09/04/2022
Nvidia website and table screenshots: nvidia.com
nvidia-smi screenshot was the output generated from my workstation with a RTX 3080.